本文自己记录vue的一些指令和使用方法, 详细文档见官方vuejs官方指南
快速入门
<!DOCTYPE html>
<html lang="en">
<head>
    <meta charset="UTF-8">
    <meta name="viewport" content="width=device-width, initial-scale=1.0">
    <title>Document</title>
    <script src="https://cdn.jsdelivr.net/npm/vue/dist/vue.js"></script>
</head>
<body>
    <div id="app">
        <span>{{msg}}</span>
    </div>

</body>
<script>
    var vm = new Vue({
        el:'#app',
        data:{
            msg:'hello world!!'
        }
    });
</script>
</html>
指令
v-text
把文本渲染到标签中
- html
<div id="app">
	 <span v-text="msg"></span>
</div>
- js
var vm = new Vue({
    el:'#app',
    data:{
        msg:'hello world!!'
    }
});
v-html
把html渲染到标签中
- html
<div id="app">
	 <span v-html="msg"></span>
</div>
- js
var vm = new Vue({
    el:'#app',
    data:{
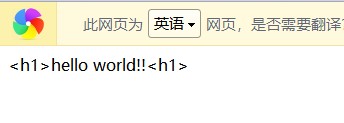
        msg:'<h1>hello world!!<h1>'
    }
});
如果使用v-text, msg中的标签将不能正常显示

v-bind
修改标签的属性
- 语法
<a v-bind:[attributeName]="url"> ... </a>
- html
<div id="app">
	<a v-bind:href='url'>google</a>
</div>
- js
var vm = new Vue({
    el:'#app',
    data:{
        url:'https://www.google.com.hk/'
    }
});
b-bind可以简化为:
<a v-bind:href='url'>google</a>
也可写作为:
<a :href='url'>google</a>
v-if
- html
<div id="app">
    <a v-if='show'>google</a>
    <a v-if='notshow'>google</a>
</div>
- js
var vm = new Vue({
    el:'#app',
    data:{
        show:true,
        notshow:false
    }
});
v-on
- 语法
<a v-on:[eventName]="doSomething"> ... </a>
- html
<div id="app">
    <button v-on:click='show'>点我</button>
</div>
- js
var vm = new Vue({
    el:'#app',
    data:{
    },
    methods:{
        show(){
            alert("hello world!!!");
        }
    }
});
v-on可简写为
<button v-on:click='show'>点我</button>
也可写作为:
<button @click='show'>点我</button>
v-model
你可以用 v-model 指令在表单 <input>、<textarea> 及 <select> 元素上创建双向数据绑定, 只可用于表单
- html
<div id="app">
    <input type="text" name="" id="" v-model="msg">
    <span v-text="msg"></span>
</div>
- js
var vm = new Vue({
    el:'#app',
    data:{
        msg:""
    }
});
v-show
- html
<div id="app">
    <h1 v-show="show">Hello, show!</h1>
    <h1 v-show="noshow">Hello, noshow!</h1>
</div>
- js
var vm = new Vue({
    el:'#app',
    data:{
        show:true,
        noshow:false
    }
});

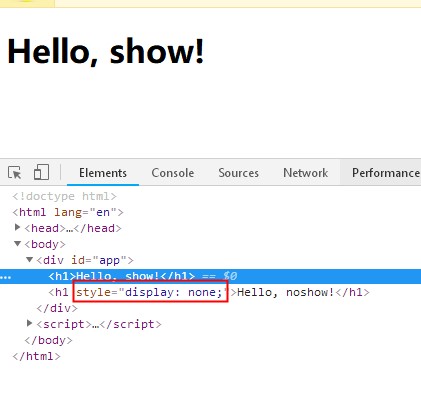
v-show上面的v-if比较:
v-if: 该节点不会渲染出来
v-show:该节点存在, 只不过display:none隐藏
v-for
列表
- html
<ul id="app">
    <li v-for="(item, index) in items" :key="item.id">
        {{index}}--{{item.id}}--{{item.msg}}
    </li>
</ul>
- js
var vm = new Vue({
    el:'#app',
    data:{
        items:[
            {id:1,msg:'msg1'},
            {id:2,msg:'msg2'},
        ]
    }
});
对象
- html
<ul id="app">
    <li v-for="(value, key, index) in items" :key="index">
        {{index}}--{{key}}--{{value}}
    </li>
</ul>
- js
var vm = new Vue({
    el:'#app',
    data:{
        items:{
            name:'xdb',
            age:18,
            address:'sh'
        }
    }
});
注意: v-for="(value, key, index) in items 第一个是对象的值, 第二个是对象的key
v-for详细讲解
改变数组
push()pop()shift()unshift()splice()sort()reverse()
数组过滤
- html
<ul id="app">
    <li v-for="(item, index) in result" :key="index">
        {{index}}--{{item.id}}--{{item.msg}}
    </li>
</ul>
- js
var vm = new Vue({
    el:'#app',
    data:{
        items:[
            {id:1,msg:'宝马'},
            {id:2,msg:'玛莎拉蒂'},
            {id:3,msg:'奥迪'},
            {id:4,msg:'奥拓'},
        ]
    },
    computed:{
        result:function(){
            return this.items.filter(function(item){
                return item.msg.indexOf("奥") != -1;
            });
        }
    }
});
遍历数字
- html
<ul id="app">
    <li v-for="i in 10" :key="i">
        {{i}}
    </li>
</ul>
- js
var vm = new Vue({
    el:'#app',
    data:{
    }
});
v-on详解
事件处理方法
- html
<div id="app">
    <button v-on:click='greet'>点我</button>
</div>
- js
var vm = new Vue({
    el:'#app',
    data:{
    },
    methods:{
        // 可以接收到原生Dom时间
        greet(event){
            console.log(event.target.tagName);
        }
    }
});
内联处理器中的方法
可以通过$event将事件传递给方法*
- html
<div id="app">
    <button v-on:click='greet("hi", $event)'>点我</button>
</div>
- js
var vm = new Vue({
    el:'#app',
    data:{
    },
    methods:{
        // 可以接收到原生Dom时间
        greet(msg, event){
            console.log(msg);
            console.log(event.target.tagName);
        }
    }
});
事件修饰符
.stop
阻止时间冒泡
.prevent
阻止事件的默认行为
.capture
改变时间触发冒泡的顺序
.self
只有事件是在自身触发时才会执行
.once
只执行一次
键盘按键监听
组件监听
- html
<div id="app">
    <input value="点我" @keyup="up">
    <input value="点我" @keydown="down">
</div>
- js
var vm = new Vue({
    el:'#app',
    data:{
    },
    methods:{
        up(event){
            console.log(event.key);
        },
        down(event){
            console.log(event.key);
        }
    }
});
全局监听
- html
<div id="app">
</div>
- js
var vm = new Vue({
    el:'#app',
    data:{
    },
    created:function() {
        var _this = this;
        document.onkeydown = function(e) {
            console.log(e.key);
        };
    },
    methods:{
    }
});
v-model
基础用法
复选框
- html
<div id="app">
    <input type="checkbox" name="" v-model='checked'>
    选择:{{checked}}
</div>
- js
var vm = new Vue({
    el:'#app',
    data:{
        checked:false
    }
});
多个复选框
- html
<div id="app">
    <input type="checkbox" id="jack" value="Jack" v-model="checkedNames">
    <label for="jack">Jack</label>
    <input type="checkbox" id="john" value="John" v-model="checkedNames">
    <label for="john">John</label>
    <input type="checkbox" id="mike" value="Mike" v-model="checkedNames">
    <label for="mike">Mike</label>
    <br>
    <span>Checked names: {{ checkedNames }}</span>
</div>
- js
var vm = new Vue({
    el:'#app',
    data:{
        checkedNames:[]
    }
});
单选按钮
- html
<div id="app">
    <input type="radio" id="one" name="radio" value="One" v-model="picked">
    <label for="one">One</label>
    <br>
    <input type="radio" id="two" name="radio" value="Two" v-model="picked">
    <label for="two">Two</label>
    <br>
    <span>Picked: {{ picked }}</span>
</div>
- js
var vm = new Vue({
    el:'#app',
    data:{
        picked : ''
    }
});
下拉框
- html
<div id="app">
    <select name="city" id="city" v-model="picked">
        <option value="北京">北京</option>
        <option value="上海">上海</option>
        <option value="广州">广州</option>
        <option value="深圳">深圳</option>
    </select>
    <label>{{picked}}</label>
</div>
- js
var vm = new Vue({
    el:'#app',
    data:{
        picked : ''
    }
});
值绑定
复选框
- html
<div id="app">
    <input type="checkbox" name="" v-model="toggle" true-value="checked" false-value="not-checked">
    <label>{{toggle}}</label>
</div>
- js
var vm = new Vue({
    el: '#app',
    data: {
        toggle: ''
    }
});
单选按钮
- html
<div id="app">
    <input type="radio" name="ra1" v-model="radio" v-bind:value="one">
    <input type="radio" name="ra1" v-model="radio" v-bind:value="two">
    <label >{{radio}}</label>
</div>
- js
var vm = new Vue({
    el: '#app',
    data: {
        radio: '',
        one:'a',
        two:'b'
    }
});
下拉框
- html
<div id="app">
    <select v-model="selected">
        <option v-bind:value="{ id: 1 }">北京</option>
        <option v-bind:value="{ id: 2 }">上海</option>
        <option v-bind:value="{ id: 3 }">广州</option>
    </select>
    <span>{{selected.id}}</span>
</div>
- js
var vm = new Vue({
    el: '#app',
    data: {
        selected: {},
    }
});
自定义指令
全局执行
- html
<div id="app">
    <input type="text" name="" id="" v-focus>
</div>
- js
// 注册一个全局自定义指令 `v-focus`
Vue.directive('focus', {
	// 指令绑定到元素上是会执行一次
    bind:function(el){

    },
	// 当被绑定的元素插入到 DOM 中时……
	inserted: function (el) {
        // 聚焦元素
        el.focus()
    },
    // 当元素更新的时候
    updated: function (el){

    }
})

var vm = new Vue({
    el: '#app',
    data: {

    }
});
局部指令
- html
<div id="app">
    <input type="text" name="" id="" v-focus>
</div>
- js
var vm = new Vue({
    el: '#app',
    data: {

    },
    directives: {
        focus: {
            // 指令的定义
            inserted: function (el) {
                el.focus()
            }
        }
    }
});
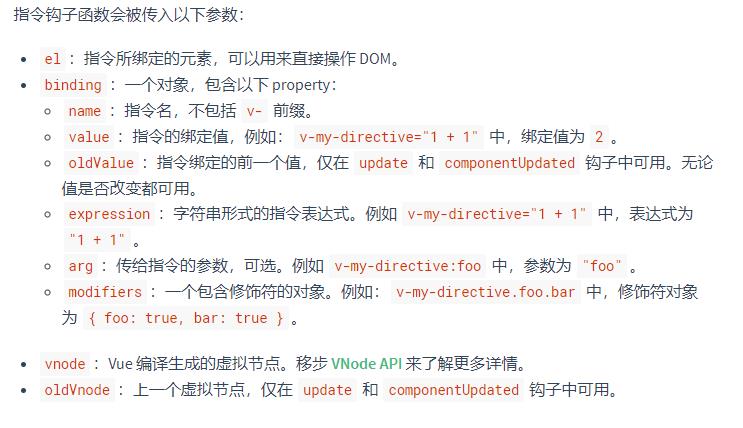
钩子函数
- bind
- inserted
- update
- componentUpdated
- unbind
钩子函数参数

可以自己定义指令,并传入字体颜色。
- html
<div id="app">
    <input type="text" name="" id="" v-color="'green'">
</div>
- js
Vue.directive("color", {
    bind:function(el,bindings){
        el.style.color=bindings.value;
    }

});
var vm = new Vue({
    el:'#app',
    data:{
        msg:'hello world!!!'
    }
});
计算属性和侦听器
计算属性-omputed
- html
<div id="app">
    <input type="text" name="" id="" :value="msg">
    <span v-text="result">123</span>
</div>
- js
var vm = new Vue({
    el:'#app',
    data:{
        msg:"hello world!!!"
    },
    computed:{
        result(){
            return this.msg.split('').reverse().join('');
        }
    }

});
侦听器-watch
- html
<div id="app">
    <input type="text" name="" id="" v-model="msg">
    <span v-text="result"></span>
</div>
- js
var vm = new Vue({
    el:'#app',
    data:{
        msg:"",
        result:''
    },
    watch:{
        msg:function(){
            this.result = this.msg.split('').reverse().join('');
        }
    }
});