本文为入门 Webpack,看这篇就够了的学习笔记, 由于该入门的webpack版本过于老旧,最新文档参考:webpack中文文档
环境安装
nodejs安装
当前时间: 2020年10月9日
nodejs_v12.19.0LTS 版本: 12.19.0LTS
设置nodejs镜像
npm config set registry "https://registry.npm.taobao.org"
npm config get registry
下面命令后显示上面淘宝的链接,说明镜像设置成功
webpack安装
全局安装
npm i webpack -g
项目路径安装
npm i webpack --save-dev

项目前准备
-
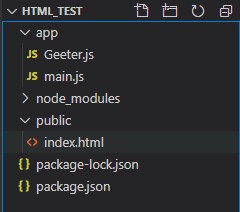
创建一个目录
本文为html_test
-
新建package.json文件
-
运行 npm init
会出现一些列问题,直接默认回车即可, 这时候我们发现刚刚的package.json就会出现如下内容:
{
  "name": "html_test",
  "version": "1.0.0",
  "description": "",
  "main": "index.js",
  "scripts": {
    "test": "echo \"Error: no test specified\" && exit 1"
  },
  "author": "",
  "license": "ISC"
}
- 在thml_test目录安装webpack
npm i webpack --save-dev
注意观察package.json里多出了如下内容:
"devDependencies": {
"webpack": "^4.44.2"
}
- 新建public目录和app目录
- 新建一些必要的文件
- index.html ---->放在public文件夹中
- Greeter.js ---->放在app文件夹中
- main.js ---->放在app文件夹中

- 在index.html和greeter.js中添加内容
index.html
<!DOCTYPE html>
<html lang="en">
<head>
    <meta charset="UTF-8">
    <meta name="viewport" content="width=device-width, initial-scale=1.0">
    <title>Document</title>
</head>
<body>
    <div id="root"></div>
    <script src="bundle.js"></script>
</body>
</html>
使用vsc快捷键:
html:5可以一键生成html5的模板文件
div[id=root]: 生成div代码
script:src: 生成script代码
Greeter.js
module.exports=function(){
    var greet = document.createElement('div');
    greet.textContent = "hi there and greetings!";
    return greet;
}
main.js
const greeter = require('./Geeter.js');
document.querySelector("#root").appendChild(greeter());
使用webpack
编译
webpack 源文件 编译后的文件
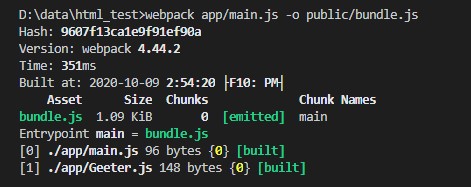
正如上面的html中我们使用的是bundle.js, 那么我们需要把main.js编译成bundle.js
webpack app/main.js -o public/bundle.js
运行过程中提示安装webpack-cli。
安装webpack-cli
命令运行过程中, 需要安装webpack-cli, 我们需要手动安装
npm i -g webpack-cli

安装完成后, 在使用上面的编译命令

打开index.html

使用配置来使用webpack
新建webpack.config.js
在项目的更目录下创建webpack.config.js文件
module.exports={
    entry: __dirname+'/app/main.js',
    output: {
        path:__dirname+'/public',
        filename:'bundle.js'
    }
}
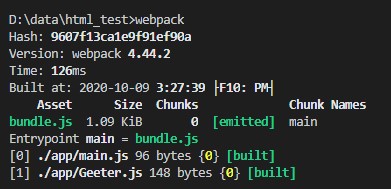
运行
webpack

加载处理css
由于webpack只能识别javascript, css需要特定的插件才能识别和处理
插件安装
npm i -D style-loader css-loader
修改webpack.config.js
module: {
    rules: [
        {
            test: /\.css$/,
            use: [
                'style-loader',
                'css-loader'
            ]
        }
    ]
}
使用
- 在app目录下新建style.css文件, 并添加如下内容
#root {
    color: red;
}
- 在入口文件中引入css
import './style.css'
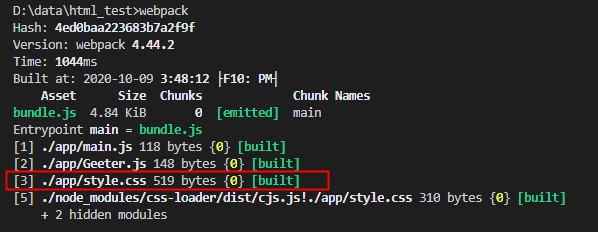
- 重新编译
webpack

发现css被处理了, 我们再次用浏览器打开index.html, 我们发现文字变为红色的了
使用webpack-dev-server
webpack-dev-server 为你提供了一个简单的 web 服务器,并且能够实时重新加载(live reloading)
安装
npm i webpack-dev-server -D
在package.json中配置
"scripts": {
    "test": "echo \"Error: no test specified\" && exit 1",
    "dev": "webpack-dev-server"
}
使用
npm run dev
参数配置
1, 自动打开链接
 "scripts": {
    "test": "echo \"Error: no test specified\" && exit 1",
    "dev":"webpack-dev-server --open"
  },
2, 修改端口
 "scripts": {
    "test": "echo \"Error: no test specified\" && exit 1",
    "dev":"webpack-dev-server --open --port 3000"
  },
3, 直接访问src目录
"scripts": {
    "test": "echo \"Error: no test specified\" && exit 1",
    "dev":"webpack-dev-server --open --port 3000 --contentBase src"
  },
4, 热更新
"scripts": {
    "test": "echo \"Error: no test specified\" && exit 1",
    "dev":"webpack-dev-server --open --port 3000 --contentBase src --hot"
  },
使用source map
当 webpack 打包源代码时,可能会很难追踪到错误和警告在源代码中的原始位置。
webpack.config.js
devtool: 'inline-source-map',
完整项目
Greeter.js
module.exports=function(){
    var greet = document.createElement('div');
    greet.textContent = "hi there and greetings!";
    return greet;
}
main.js
const greeter = require('./Geeter.js');
import './style.css'
document.querySelector("#root").appendChild(greeter());
style.css
#root {
    color: red;
}
index.html
<!DOCTYPE html>
<html lang="en">
<head>
    <meta charset="UTF-8">
    <meta name="viewport" content="width=device-width, initial-scale=1.0">
    <title>Document</title>
</head>
<body>
    <div id="root"></div>
    <script src="bundle.js"></script>
</body>
</html>
package.json
{
  "name": "html_test",
  "version": "1.0.0",
  "description": "webpack-test",
  "main": "index.js",
  "scripts": {
    "test": "echo \"Error: no test specified\" && exit 1",
    "dev": "webpack-dev-server"
  },
  "author": "",
  "license": "ISC",
  "devDependencies": {
    "css-loader": "^4.3.0",
    "style-loader": "^1.3.0",
    "webpack-cli": "^3.3.12",
    "webpack-dev-server": "^3.11.0"
  }
}
webpack.config.js
module.exports = {
    mode: 'development',
    entry: __dirname + '/app/main.js',
    devtool: 'inline-source-map',
    output: {
        path: __dirname + '/public',
        filename: 'bundle.js'
    },
    module: {
        rules: [
            {
                test: /\.css$/,
                use: [
                    'style-loader',
                    'css-loader'
                ]
            }
        ]
    }
}